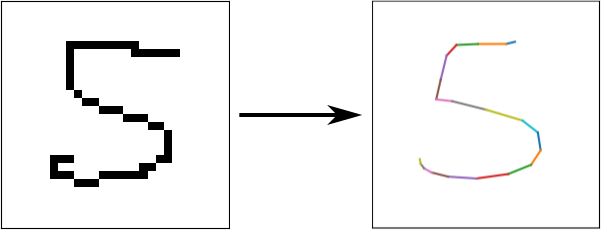
Some time ago on my repository I was ask whether a model for handwriting can be used to generate sequence of numbers. As it turn out, the quality of such handwritten numbers was pretty bad. Although the problem seems to be quite easy there is no good dataset to train model on. So I decided to create a model to generate such dataset.
The task is to take an image of digit and label as the input and produce sequence of points representing that digit. Because we are speaking of sequences, natural thing is to try applying Recurrent Neural Network (RNN) [1].
To make this task a little simpler we are going to use a thinned version of MNIST dataset [2]. This way our model won’t need to learn how to represent thickness of a line, but we trade the overall quality of some digits due to thinning process.
But how?
We want sequence of points as the result of the model. My first idea was to unroll RNN for some number of steps, getting at each step a single point and in the result a sequence. But there is one problem, how to train such model?
We only have image and label. Here comes the second idea. We need something able to draw a line. Being able to draw lines from points onto 2D image would allow us to turn sequence of previously generated points into an image of digit. Using mean square error as a loss function we would be able to train RNN. Whole model can be interpreted as an autoencoder, because it tries to reconstruct its inputs, but we kind of constraint its internal representation (forcing it to be sequence of points).
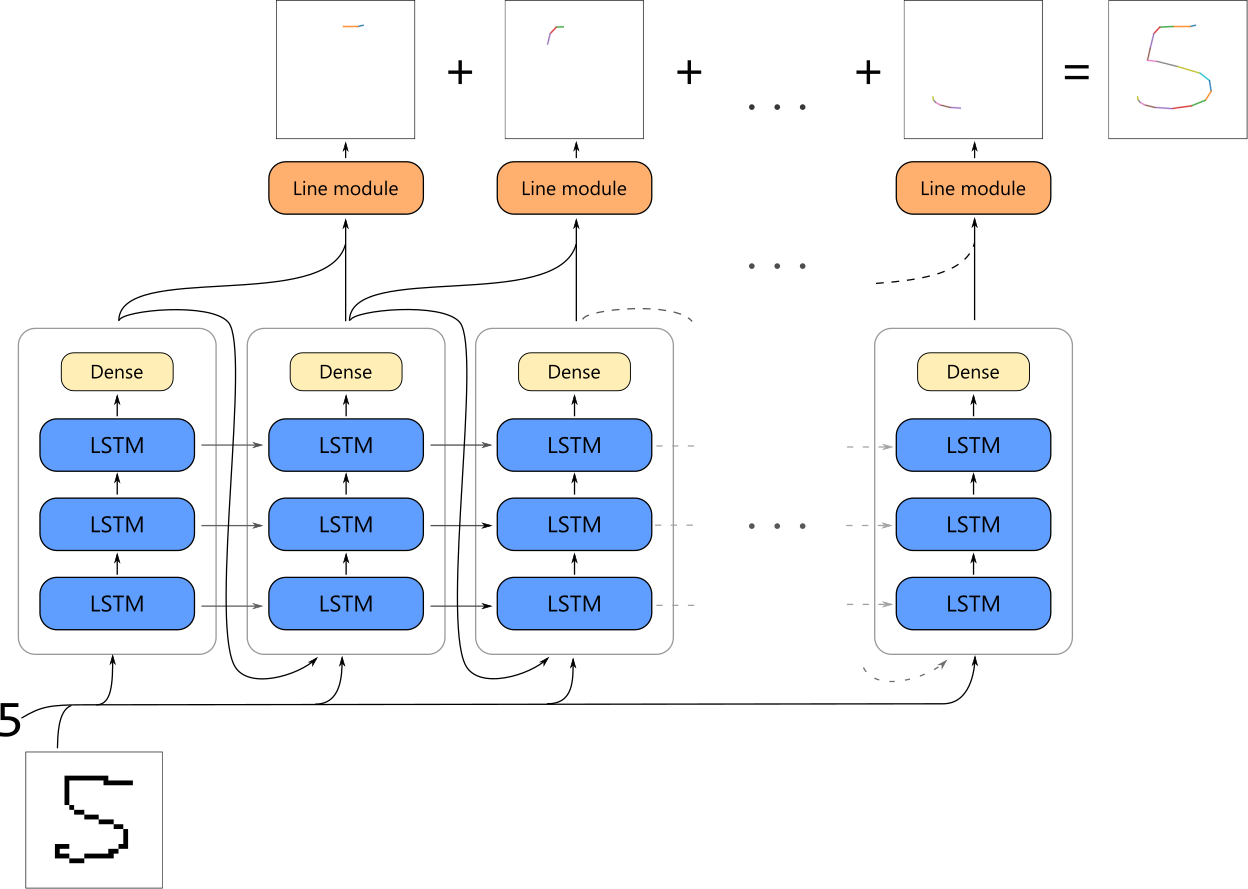
Above images shows how graph for such a model looks like. At the core of a model we have three LSTM layers with 512 neurons each. Next we use dense layer with 3 neurons to generate coordinates at each step. First two coordinates are simply x and y on a plane, third coordinate informs whether the pen should be lifted after that point. When network generated all points we run line model on each consecutive pair of coordinates to generate line images. Lastly we sum all partial images to obtain final image of a digit.
Here is a code for this model written in tensorflow:
def run_handwriting_model(inputs, labels, num_segments=20, reuse=True):
    with tf.variable_scope('handwriting', reuse=reuse):
        flatten = tf.reshape(inputs, [-1, np.prod(inputs.get_shape().as_list()[1:])])

        cells = [tf.nn.rnn_cell.LSTMCell(512),
                 tf.nn.rnn_cell.LSTMCell(512),
                 tf.nn.rnn_cell.LSTMCell(512, num_proj=3)]

        lstm_cells = tf.nn.rnn_cell.MultiRNNCell(cells)

        batch_size = tf.shape(inputs)[0]
        coord = tf.zeros(shape=[batch_size, 3])
        state = lstm_cells.zero_state(batch_size, dtype=tf.float32)

        # generate coordinates
        coords = []
        for s in range(num_segments):
            lstm_input = tf.concat([flatten, labels, coord], axis=-1)
            with tf.variable_scope('points', reuse=reuse if s == 0 else True):
                new_coord, state = lstm_cells(lstm_input, state)
            coord = tf.nn.sigmoid(new_coord)
            coords += [coord]

    # create image from coords
    generated = tf.zeros_like(inputs)
    for p1, p2 in zip(coords, coords[1:]):
        generated += run_line_model(tf.concat([p1, p2], axis=-1))

    return tf.stack(coords, axis=1), generated
To make this model work we now need to create run_line_model function.
Drawing lines
First approach I tried was to train another neural network to generate images with lines given two coordinates. I created batches to train this network using opencv in python:
def next_batch(batch_size):
    coords = np.empty((batch_size, 6))  # (start_x, start_y, eol_1, end_x, end_y, eol_2)
    imgs = np.zeros((batch_size, 28, 28, 1), dtype=np.uint8)

    for b in range(batch_size):
        x1, y1, x2, y2 = [random.random() for _ in range(4)]
        e1, e2 = [int(random.random() > 0.8) for _ in range(2)]
        coords[b, :] = [x1, y1, e1, x2, y2, e2]
        if e1 < 0.5:  # if e1 is 1 then the pen is lifted, so no line is drawn
            cv2.line(imgs[b], (int(28 * x1), int(28 * y1)), (int(28 * x2), int(28 * y2)),
                     (255, 255, 255), 1)
    return coords, imgs.astype(np.float32) / 255.
Having data to train on, we can now prepare model. This will be simple two dense layers followed by two convolutional layers. Code snippet below.
def run_line_model(inputs, reuse=True):
    with tf.variable_scope('line_model', reuse=reuse):
        h = tf.layers.dense(inputs, 28 * 28, activation=tf.nn.elu, name='d1')
        h = tf.layers.dense(h, 28 * 28 * 8, activation=tf.nn.elu, name='d2')
        h = tf.reshape(h, [-1, 28, 28, 8])
        h = tf.layers.conv2d(h, 16, kernel_size=(5, 5), padding='same',
                             activation=tf.nn.elu, name='c1')
        return tf.layers.conv2d(h, 1, kernel_size=(3, 3), padding='same',
                                activation=tf.nn.sigmoid, name='generated')
After training this network on 1.6 million images we can see that it gets pretty close to how a line should look like but there are visible artifacts and lines are essentially blurry. But we can still try using this line model as a generator for our handwriting model. For that we will need to freeze all weights in line model, because otherwise it would forget how to draw lines and adapt for better image reconstruction (and we care more about internal representation).
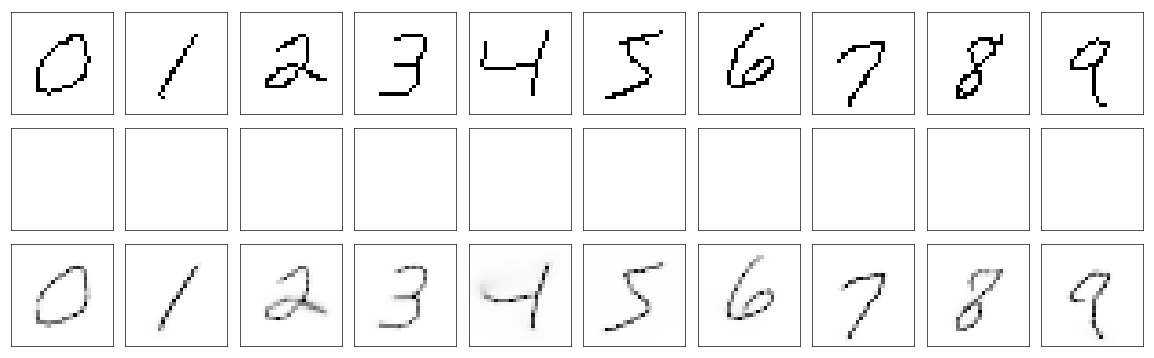
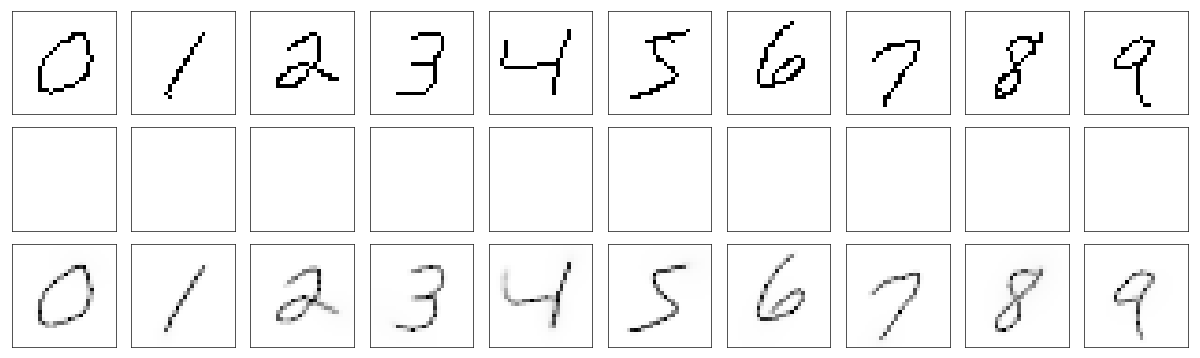
Generated images
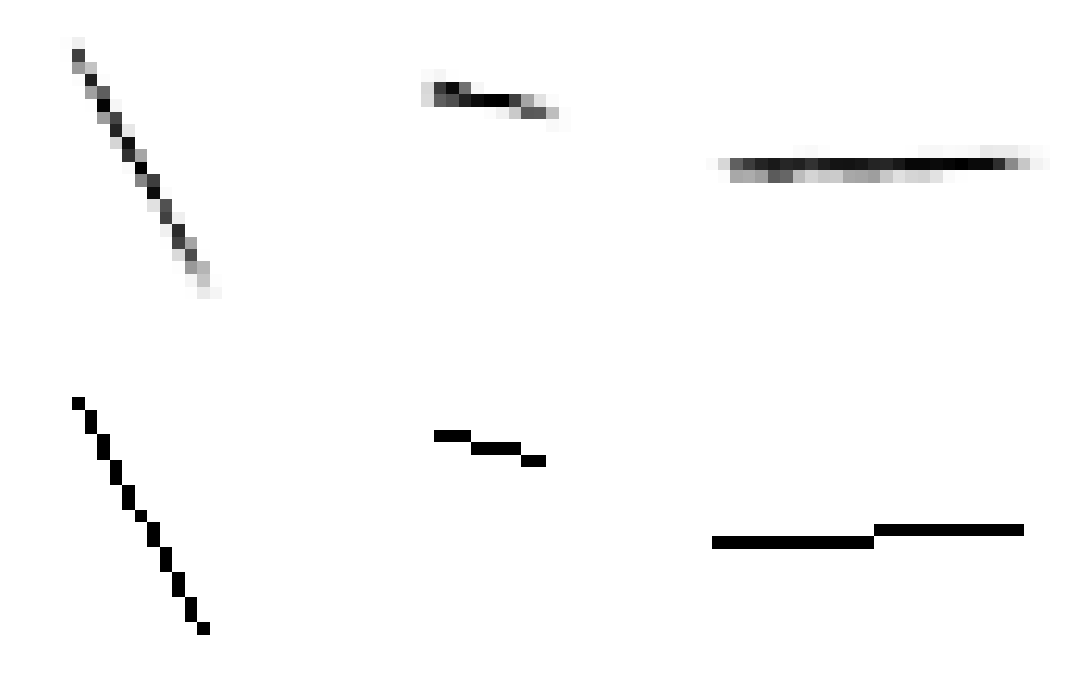
Ground truth images
Generating handwriting
Having line model we can finally plug everything together and train out main model. I trained it for only 5 epochs over whole thinned MNIST dataset because I observed that more epochs causes network to overfit to examples creating segments in a stairway fashion (to fit pixels more accurately). And we finally have some results!
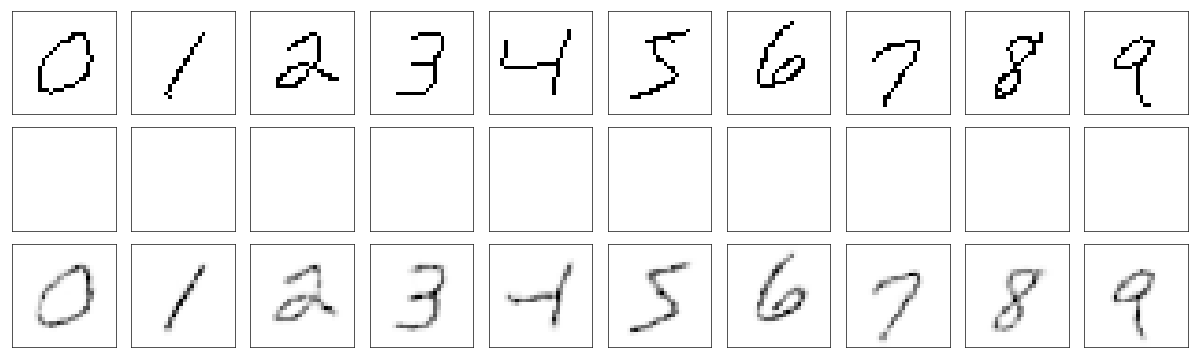
Top row shows ground truth, on middle one we can see how network draws and at the bottom is the reconstruction.
And… they are not very impressive. Some digits like 2 or 3 clearly show that main model learned how to abuse line model. There are segments that are not shown on reconstruction. This line model also has one other problem. Because output values on lines are not exactly 1, main model draws multiple lines in the same place just to make it closer to 1 which minimizes loss. Obviously we need better model for drawing lines.
Drawing lines - improvements
One possible improvement is to came up with function that draws a line and uses differentiable calculations (so it can be used in training with gradient methods). How can we do this?
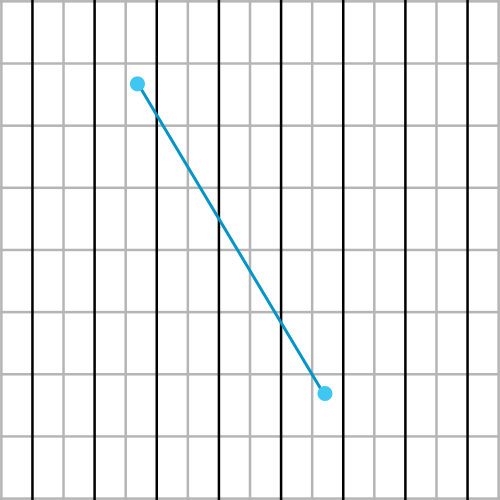
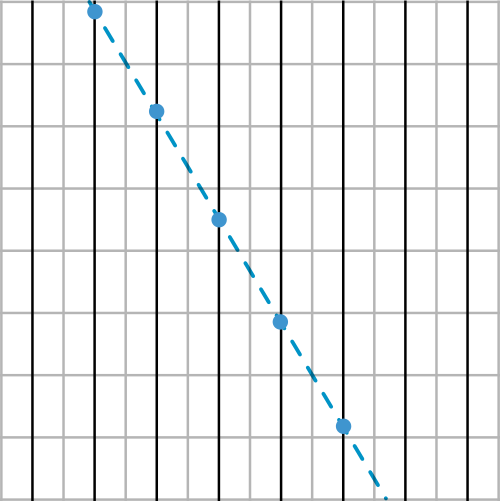
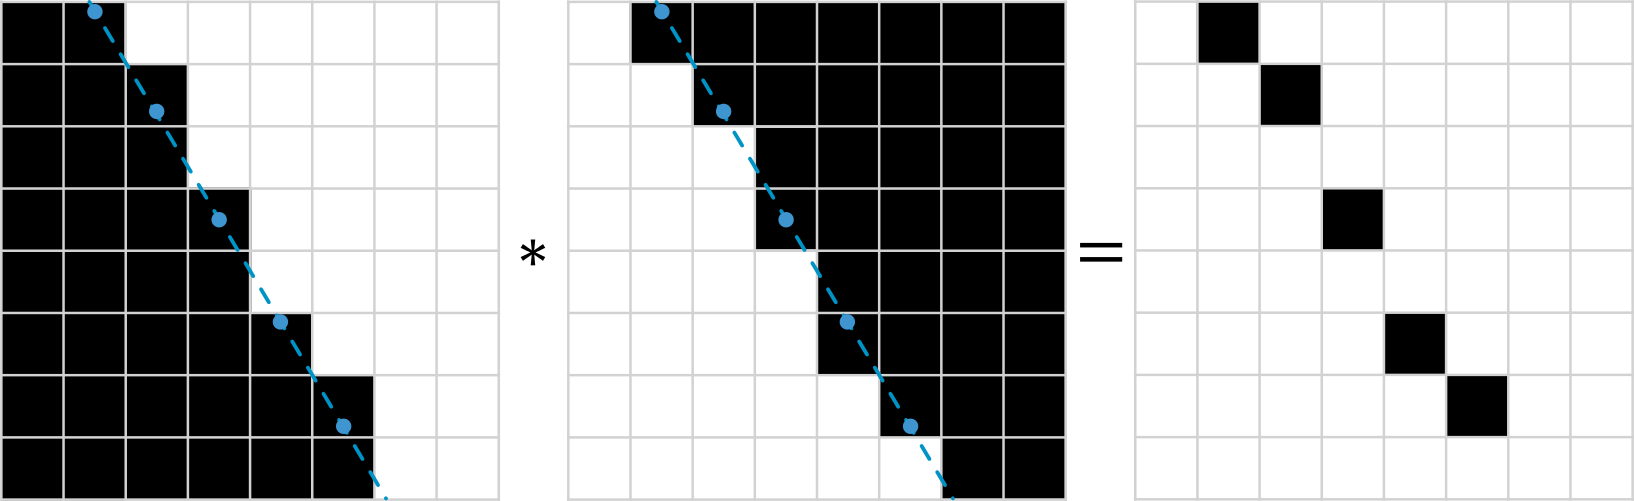
We can imagine a grid with 28 vertical lines and 28 horizontal lines (because of dimensions of MNIST digits). Now we will search for intersection points for each of those lines and bucket those points into pixels that will be lighten up in the final image. This explanation is a little handwavy so lets walk through it with the help of images below.
Example grid of 8x8 pixels.

Vertical lines for testing which pixel should be on line.

Let's add a segment.
Then extend it to line and calculate all intersection points.
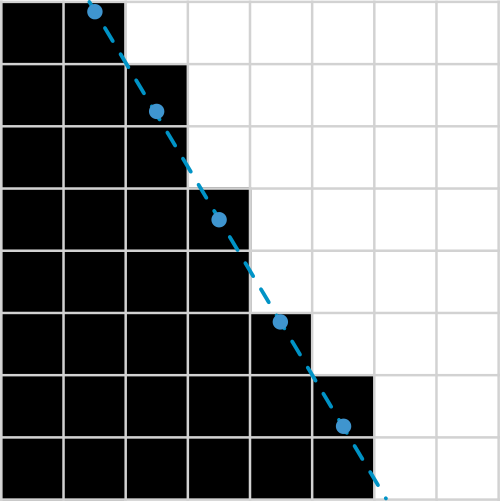
Now we create first mask with every pixel that is below (or on) intersection point.
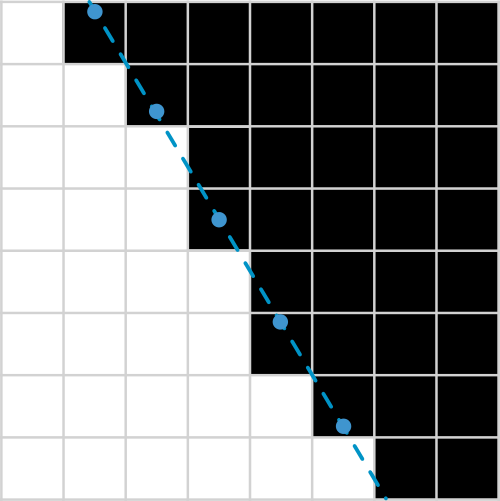
And another mask with every pixel that is above (or on) intersection point.
Multiplying those mask gives as part of a line.
Repeating the same process for horizontal lines gives as another part of line.
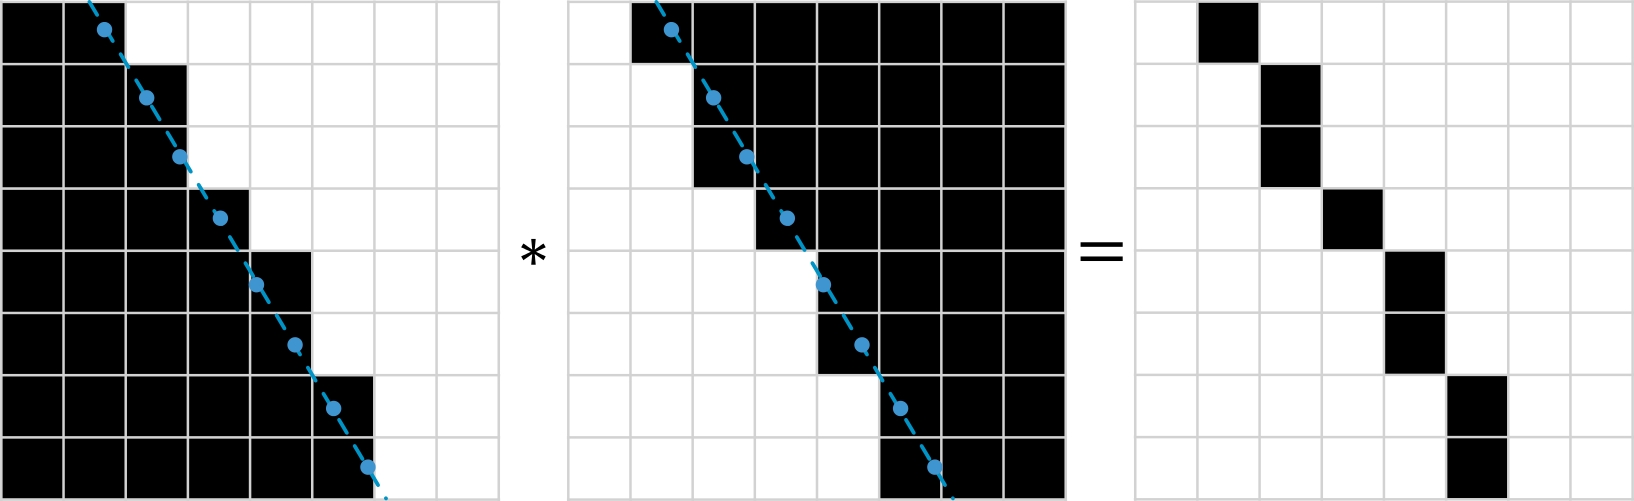
Next we take element-wise maximum over masks. This gives as final line.
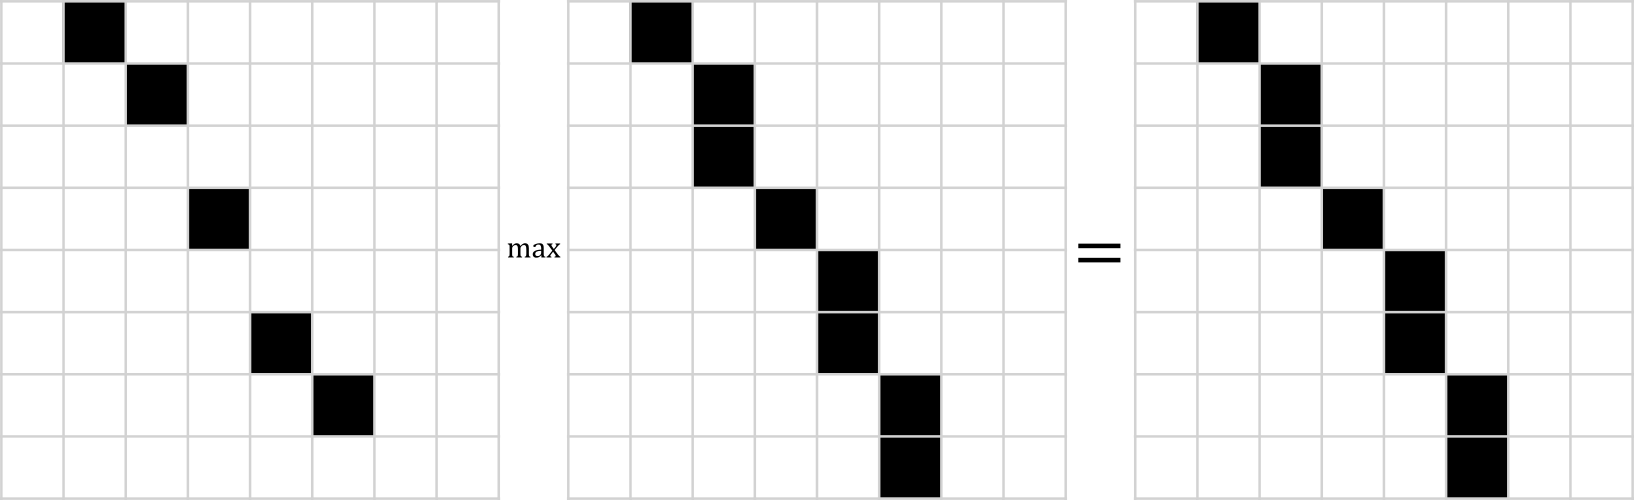
But we need to do one more thing. Turn line into segment. To do this, we create another mask that have every pixel in rectangle that contains original segment. Finally we can multiply this mask with our line to obtain segment.
Uff… that’s it. There is one little thing thats missing here. When we obtain masks we need some function that will assign 1 for values greater than 0, and 0 for values that are less than 0. To avoid conditional assignments (that would make this function not differentiable) we can use sigmoid. The problem with sigmoid is that it changes rather slowly in domain we are going to use it (our values will be mostly in range -1 to 1). To help with that we will use additional parameter, let’s call it “softness”. We will force it to be always greater or equal to 0 and use it to scale input to sigmoid function and let the network learn how to use it.
\[soften(x) = \sigma (x \cdot softness)\]This solution has additional advantage. Like before we would like to have an option to not draw a line. Previously this was done with third coordinate informing whether a pen was lifted. Now we will use third coordinate as “softness”, so network can set it to very small value, which will have almost the same result (although output values will not be exactly zero).
Below is whole idea coded in tensorflow (may look more complicated than it actually is because of extensive use of broadcasting to make it work on batches):
def run_line_model(inputs, size=28):
    def soften(x, softness):
        return tf.sigmoid(x * softness)

    # intersection line coordinates (vertical and horizontal)
    xs = tf.expand_dims(tf.linspace(0.5 / size, 1. - 0.5 / size, size), axis=0)
    # pixels intervals
    pixels = tf.expand_dims(tf.expand_dims(tf.linspace(0., 1., size + 1), axis=1), axis=0)

    mesh_y = tf.tile(pixels, multiples=[1, 1, size + 1])
    mesh_x = tf.tile(tf.transpose(pixels, perm=[0, 2, 1]), multiples=[1, size + 1, 1])

    softness = tf.expand_dims(points[:, 2:3], axis=2)
    x1, y1, x2, y2 = points[:, 0:1], points[:, 1:2], points[:, 3:4], points[:, 4:5]

    direction = points[:, 3:5] - points[:, 0:2]
    direction /= tf.sqrt(tf.reduce_sum(tf.square(direction), axis=-1, keep_dims=True) + 1e-7)

    # vertical intersections
    inv_cos = 1. / (direction[:, 0:1] + 1e-8)
    vertical = (xs - x1) * inv_cos * direction[:, 1:2] + y1
    vertical = tf.expand_dims(vertical, axis=1)

    # horizontal intersections
    inv_cos = 1. / (direction[:, 1:2] + 1e-8)
    horizontal = (xs - y1) * inv_cos * direction[:, 0:1] + x1
    horizontal = tf.expand_dims(horizontal, axis=1)

    pixel_offset = 1. / size

    # vertical masks
    lower_px = soften(vertical - pixels, softness)
    upper_px = soften(pixels - vertical + pixel_offset, softness)
    vcombined = lower_px * upper_px
    vcombined = vcombined[:, :-1, :]

    # horizontal masks
    lower_px = soften(horizontal - pixels, softness)
    upper_px = soften(pixels - horizontal + pixel_offset, softness)
    hcombined = lower_px * upper_px
    hcombined = hcombined[:, :-1, :]
    hcombined = tf.transpose(hcombined, perm=[0, 2, 1])

    on_line = tf.maximum(vcombined, hcombined)

    # rectangle mask
    xmin = tf.expand_dims(tf.minimum(x1, x2), axis=1)
    xmax = tf.expand_dims(tf.maximum(x1, x2), axis=1)
    ymin = tf.expand_dims(tf.minimum(y1, y2), axis=1)
    ymax = tf.expand_dims(tf.maximum(y1, y2), axis=1)

    rect_mask = soften(mesh_x - xmin, softness)
    rect_mask *= soften(mesh_y - ymin, softness)
    rect_mask *= soften(xmax - mesh_x + pixel_offset, softness)
    rect_mask *= soften(ymax - mesh_y + pixel_offset, softness)

    return tf.expand_dims(on_line * rect_mask[:, 1:, 1:], axis=3)
Using new method
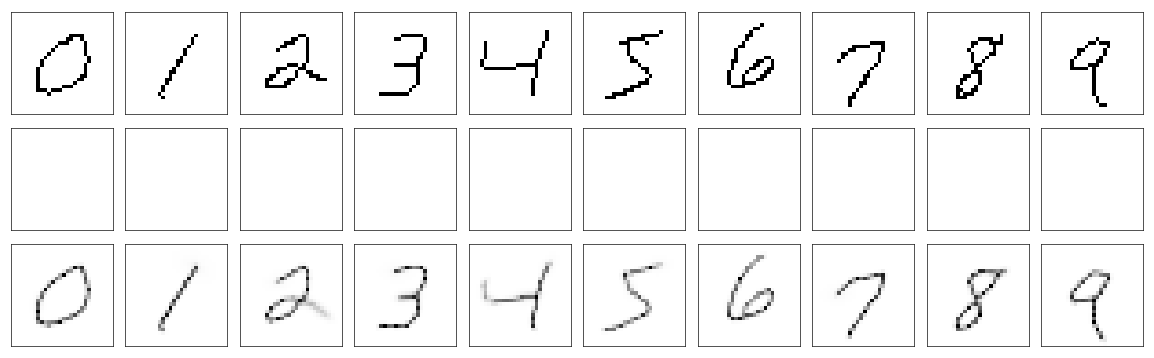
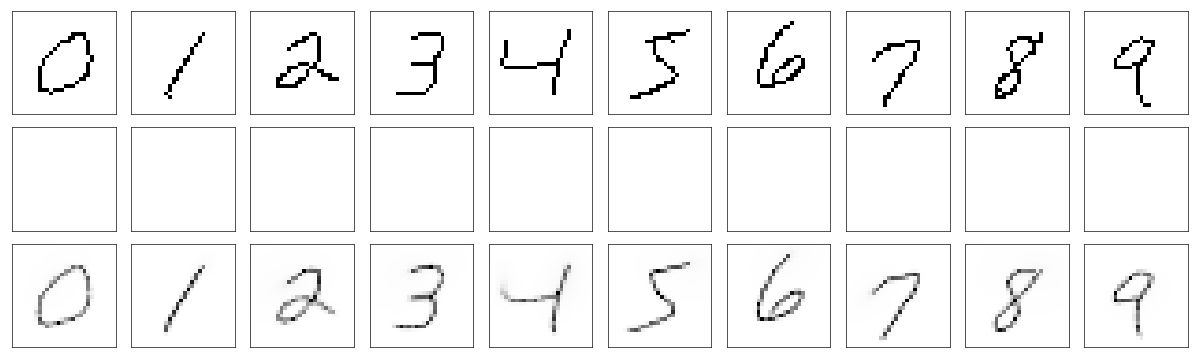
So I trained same model as before, just changed run_line_model method. Similarly model was trained for 5 epochs, with AdamOptimizer and learning rate was set to \(0.0005\). The results are better than before, especially there is no artifacts like lines missing in reconstruction but present on drawing.
Although it looks good, the model has very high variance in case of some digits. Simple digits like: 1, 7, 0, are almost always drawn the same way by neural network. But other digits are drawn much more different from run to tun.
Other ideas and experiments
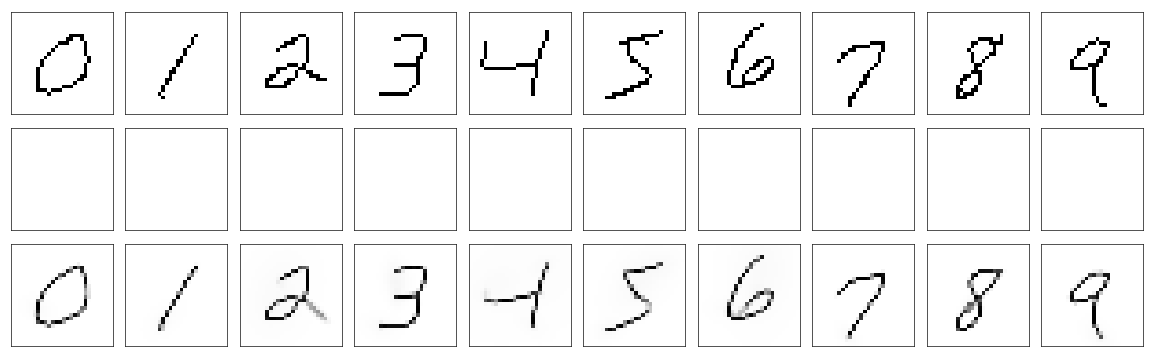
Dropout
Because this network is relatively large for this task it’s probably a good idea to regularize this model a little. For example we can add Dropout on second and third LSTM layer.
It seems that results aren’t that much different from not regularized model.
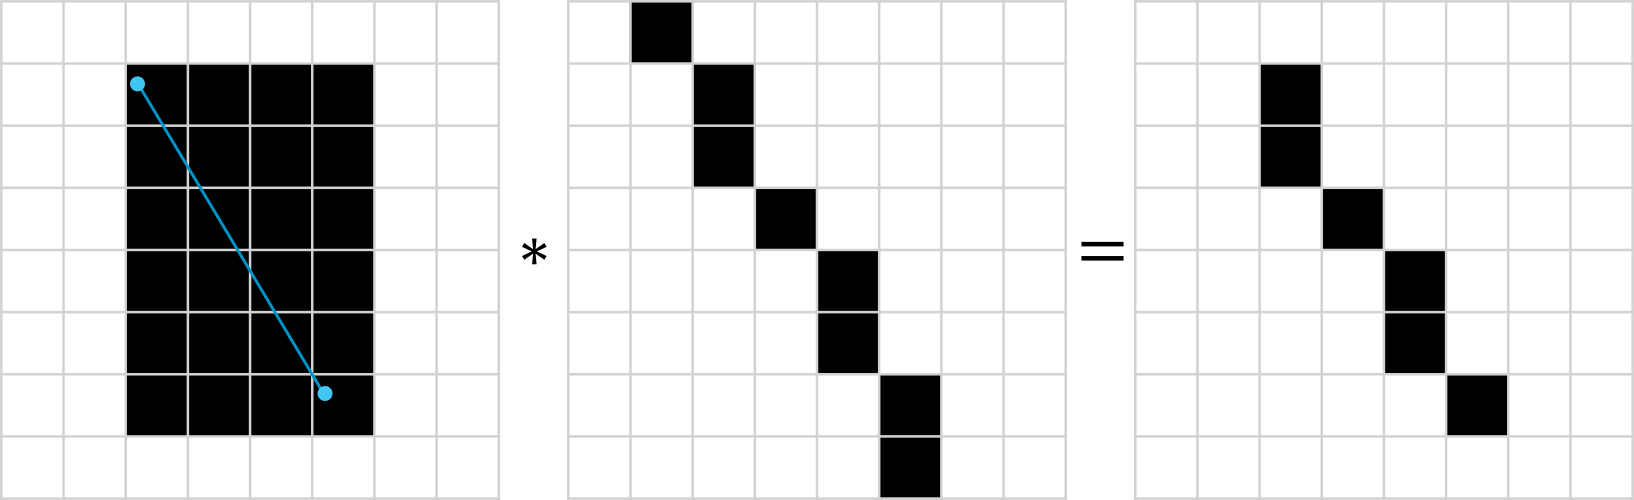
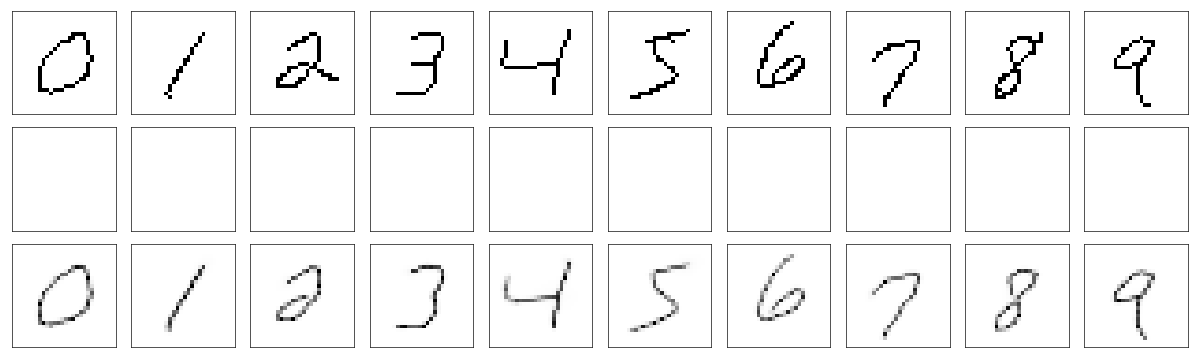
Maximum instead of sum
Another thing that we can test is changing sum to max when putting partial images into a final image.
# from
generated += run_line_model(tf.concat([p1, p2], axis=-1))
# to
generated = tf.maximum(generated, run_line_model(tf.concat([p1, p2], axis=-1)))
This allows network to draw multiple lines in the same place without exceeding 1 on pixel values. We can see that network is less concerned about intersections while drawing, unlike when we used sum.
Different losses
For example we can in addition to MSE penalize lines that are very long or penalize rapid changes in angle between consecutive segments.
Here’s for code for additional losses:
# angular loss
vectors = handwriting[:, 1:, :2] - handwriting[:, :-1, :2]
vectors /= tf.sqrt(tf.reduce_sum(tf.square(vectors), axis=-1, keep_dims=True) + 1e-7)
angles = tf.reduce_sum(vectors[:, 1:, :] * vectors[:, :-1, :], axis=-1)
aux_angle_loss = 1. - tf.reduce_mean(angles)

# distance loss
distances = tf.sqrt(tf.reduce_sum(tf.square(handwriting[:, 1:, :2] - handwriting[:, :-1, :2]),
                                  axis=-1))
aux_dist_loss = tf.reduce_mean(distances)

# later...
loss += 0.01 * aux_dist_loss
loss += 0.01 * aux_angle_loss
Theoretically some digits like 6, 8 should be more similar to those written by human and in fact with those auxiliary losses the results do look better in my opinion than before.
Separate model for each digit
So far the best model I was able to train to generate digits was in fact an ensemble of models. Each digit has its own model with almost the same architecture as previously. The differences are in number of neurons in each LSTM layer. Previously it was 512 per layer, now it is 64 per layer. Another difference is that each layer gets coords and labels as input (not just first layer). I trained each model with auxiliary losses shown above.
The results are really good. But I wanted the digits to look more natural, so I decided to collect small number of examples with consecutive points for each of digits. Later while training I do interchangeably gradient descent on MNIST data and those collected samples. Here are some results:
And finally something that looks really well! Almost like if human wrote those digits.
Some interesting things
Image below shows how model works when instead of image of actual digit we insert constant value. We can see that with only zeros digits look smaller and with ones they are really big. In some sense those represent how average digit looks like. Interestingly inputs with constant values greater than 0 always resulted in digits looking the same as digits in second row.
Drawings when instead of digit image we use only zeros.

Drawings when we only give ones as input image.
Code and handwritten MNIST dataset
I put code for current best model on github repository as well as handwritten MNIST dataset, available freely to anyone interested. 😁
(1): Great post about LSTMs - http://colah.github.io/posts/2015-08-Understanding-LSTMs
(2): Thinned version of MNIST dataset - https://edwin-de-jong.github.io/blog/mnist-sequence-data
Hope you enjoyed this post! I appreciate any form of feedback and if you found any mistake, please let me know (email is on my github profile).